Lock, Key, and Encrypt: Exploring the Power of PSI Protection
Introduction
The protection of sensitive information (PSI) has become paramount in an age where data flows freely and connectivity is the norm. As we navigate the digital landscape, it has never been more crucial to bolster our defenses and shield our most sensitive data. The importance of implementing effective PSI protection measures is non-negotiable for everyone, whether you’re an individual on a journey to protect your identity or a business entrusted with sensitive client information.
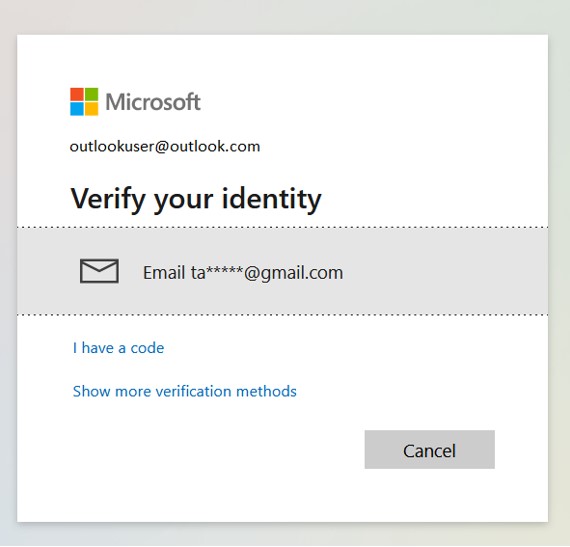
For example, if you log into any e-commerce, digital payment platform, or financial service such as mobile banking or internet banking, or any mail client, it will mask sensitive data such as debit or credit card numbers, contact information such as a phone number or email address, account information such as an account number or PAN number, and so on.
In the same way, if you want to view your profile on an e-commerce site, financial website, or mail client and forget your password, an OTP is sent to either an email or a phone number that is masked. Sensitive information or personal identity must be masked in many real-world situations. Below is a screenshot explaining the information visually so there are no misunderstandings.
In the upcoming sections, we will walk you through a real-life scenario, demonstrating how Spring Boot can be your ally in masking confidential data.
Setting up the project
As a first step, we will need to set up a Spring Boot Application either manually or using Spring Initializr along with the following dependencies:
- Spring Web – Build web, including RESTful, applications using Spring MVC. Uses Apache Tomcat as the default embedded container.
- Spring Data JPA – Persist data in SQL stores with Java Persistence API using Spring Data and Hibernate.
- PostgreSQL Driver – A JDBC and R2DBC driver that allows Java programs to connect to a PostgreSQL database using standard, database-independent Java code.
- Lombok – Java annotation library which helps to reduce boilerplate code.
If you need help creating a Spring Boot application, follow this link Spring Initializr
We should open this project in our preferred IDE as soon as that is done.
Update Configuration file
To configure the database, we can use either application.properties or application.yml. After we have configured the database, we will need to create packages and classes such as Models, Repositories, Services, DTOs, and Controllers to store and retrieve data.
The next step is to create endpoints based on your needs. This scenario considers two endpoints: adding and retrieving employee information.
Now that we have completed the above development, let’s run this application and consume the API using Postman.
- The test performs on the endpoint [Add Employee] can be accessed using (http://localhost:8080/employees ), and the request body it generates is shown in the screenshot below –
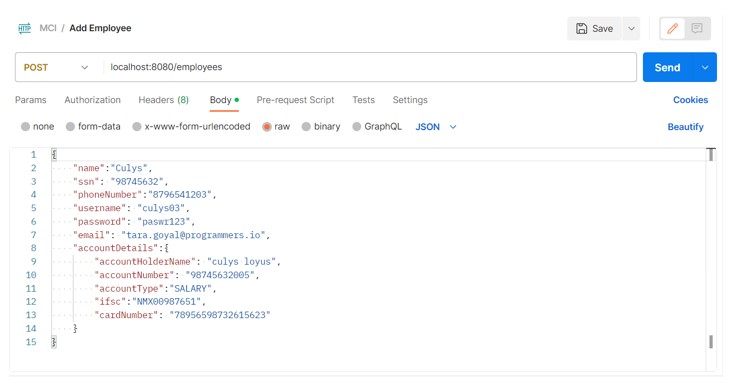
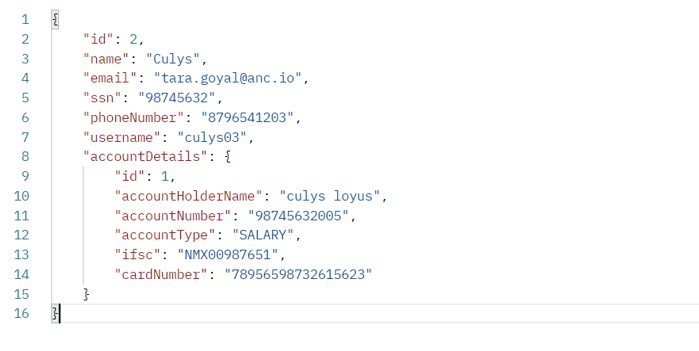
2. We received a response after data was persisted into the database, which can be seen in the screenshot below as a JSON object in plain text, including confidential information such as `ssn`, `email`, `phoneNumber`, `accountNumber`, and `cardNumber`.
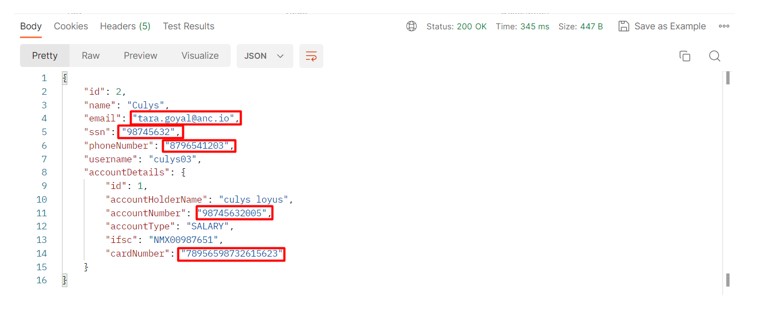
The fact that we exposed confidential information in plain text makes it possible to conceal it if we wish; otherwise, a high price would be required. It could pose a security risk.
Masking Confidential Data
Now is the time to conceal sensitive information. Here are a few easy steps you can take to mask confidential data –
- The first step is to create a package called ‘encrypt’ and then create the files ‘DataMask.java’ and ‘EncryptDataSerializer’. Lastly, we need to add the following code to each file:
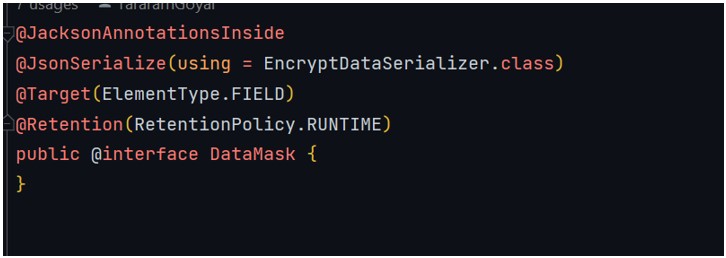
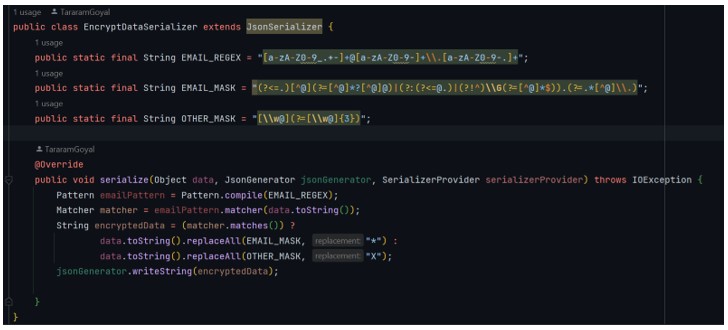
- The code below shows you how to add our constructed @DataMask annotations to fields that you want to mask (`email `, `ssn `, `phoneNumber `, ` accountNumber `, and `cardNumber `).
- This application may now either be ‘Rebuilt’ or ‘Rerun’.
- Finally, now the [Get Employee] can be accessed using the (http://localhost:8080/employees ) endpoint. The response is shown in the screenshot below:
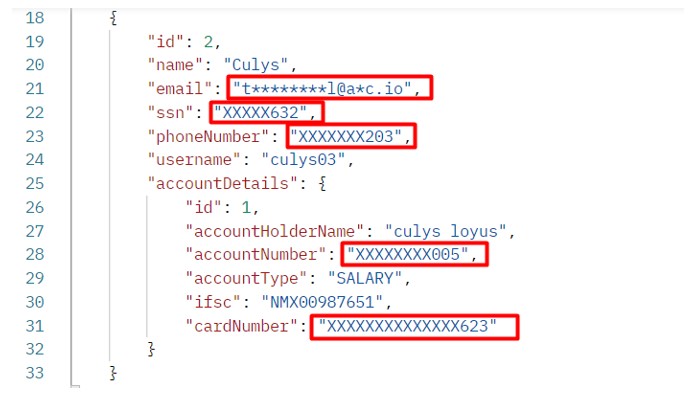
- You can see in the designated red rectangle box that all the secret data is masked by ‘*’ and ‘X’ characters, so no one can misuse it.
Response Before Masking Confidential Data
Response of After Masking Confidential Data
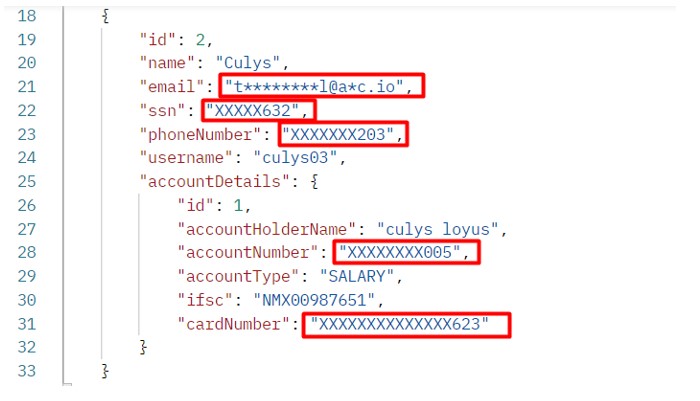
The differences between the two responses are now clearly visible.
Conclusion
Protecting sensitive information is not a one-time task; it’s an ongoing commitment. By implementing a multi-faceted approach that includes encryption, access controls, employee education, and vigilant monitoring, you can significantly reduce the risk of data breaches and unauthorized access. Safeguarding sensitive information isn’t just about compliance; it’s about maintaining trust, preserving privacy, and upholding the integrity of the digital world we inhabit. Remember, safeguarding PSI not only protects personal and corporate interests but also fosters trust and confidence among customers, clients, and partners. A robust security posture is the key to thriving in today’s digital landscape.
How can we help you?
We have hundreds of highly-qualified, experienced experts working in 70+ technologies.
