From purchase orders to inventory updates, file-based communication still drives the heartbeat of many enterprises.
But the question is that…,
Are you handling it efficiently?
Introduction
In today’s digital world, efficient and secure data exchange is vital for business success. As a leader in ecosystem integration, Cleo offers tools for connecting internal systems, partners, and cloud platforms. A key component of this integration is Cleo’s File Adapters, which enable seamless, automated business processes across diverse environments.
Let us unpack what Cleo File Adapters are and how they drive value across business processes.
Core Concepts
A. Project explorer
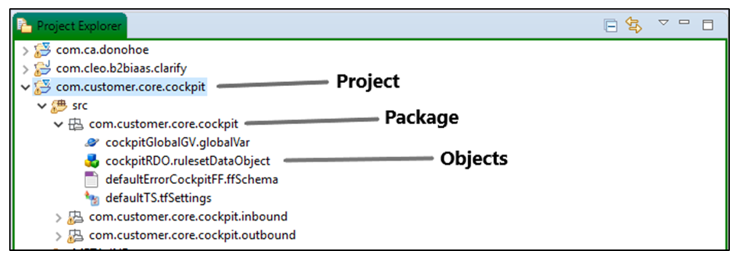
1. Project
- A Project is a top-level container for organizing design-time objects in Cleo. It serves as the deployable unit for the CIC Integration Engine and the shareable unit for team collaboration through version control systems like SVN.
- Projects enable version tracking, change synchronization, and collaborative development by enabling teams to manage and review changes efficiently.
2. Package
- A Package is the secondary hierarchical level, or child folder, used for organizing objects. A Project can contain one or more Packages. For example, you can create different Packages according to their functionality, usability, or category.
- A common use is for the direction of the documents to be processed: inbound or outbound.
3. Objects
- An individual Object, referred to as a resource, is located within one Package. An object is in only one place at a time.
- Code Tables, Rulesets, Business Processes, and EDI Envelopers are examples of objects that you create and configure in the Studio.
B. Adapter
File Adapter is an object used to manage file-based information through Clarify. It supports common file operations.
- Copy: It copies files from one folder to another. Common uses include copying transactional files from their “pick-up” location to a designated archive folder.
- Delete: It deletes a file from a folder. Typically used as a purge mechanism for archived files.
- Move: It moves a file from one folder to another. Common uses include moving files from a “staging location” to a “pick-up” location.
- Read: It reads a file and makes the data accessible to other components.
- Write: It writes data to a file.
You can create a File Adapter to read from, write to, copy, move, or delete files in a local or network directory.
1. Create Read Adapter
Right-click and select the Package (as shown in Fig. 1.2.1 below) and set up the New File Adapter under the selected Package.
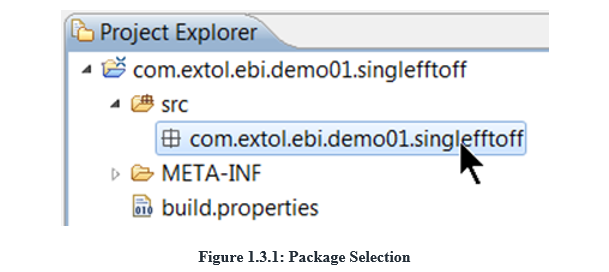
- To create a File Adaptor, take the following steps:
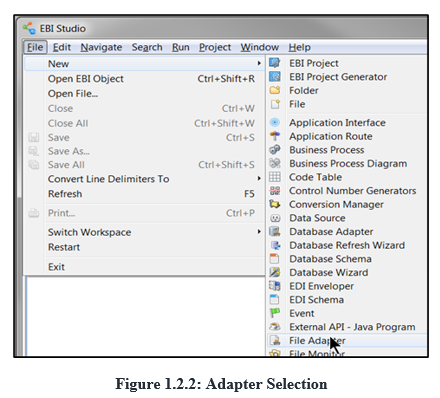
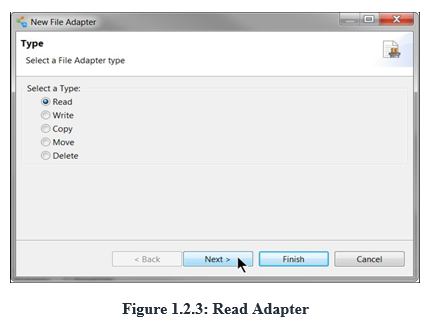
Select “File > New > File Adapter” from the main menu (as shown in Fig 1.2.2). The New File Adapter window appears (as shown in Fig 1.2.3).
- Select a File Adapter type (Read, Write, Copy, Move, or Delete) to create one and click Next (as shown in Fig 1.2.3).
- Type “ReadCsvFA” as an Adapter Name in the “Name” field (as shown in Fig 1.2.4) and click Finish.
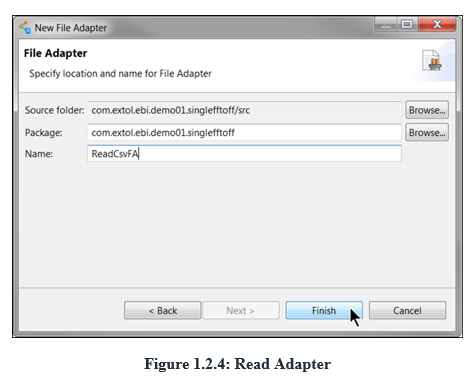
- The “Source folder” and “Package” fields are automatically filled out when we create File Adaptors under certain packages.
- The “File Adaptor” object is created, and its editor appears (as shown in Fig 1.2.5).
- Click in the “File Name” field and click to browse button (highlighted Red Box as shown in Fig 1.2.5) for a file used under the Copy function of the File Adaptor.

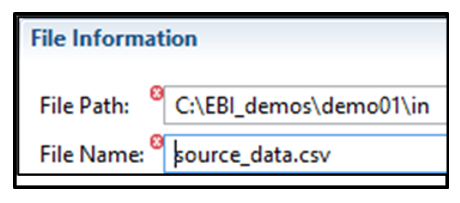
- Locate/select the “source_data.csv” file from the “C:\EBI_demos\demo01\in” folder and select the file (Fig 1.2.6).

- The File Path and File Name fields are reflected in the Adapter Editor as shown below (Fig 1.2.7).
- Save the object and close the editor.
- Follow the above steps to create a Write, Copy, Move, or Delete adapter.
- The Read Adapter reads the file from the input location and is used in the Business Process (BPS) to read the source data.
C. Business Process
In a user-defined sequence, the Business Process object performs tasks on data. It can activate all other objects.
1. To create a Business Process:
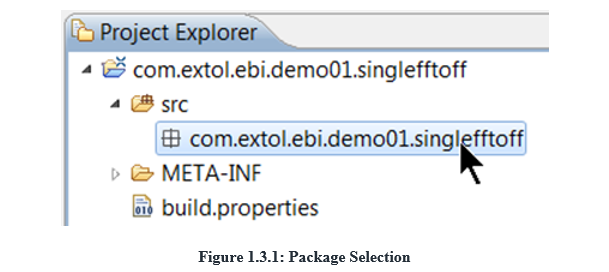
- Select the Package and right-click on it to set up the New Business Process (Fig. 1.3.1).
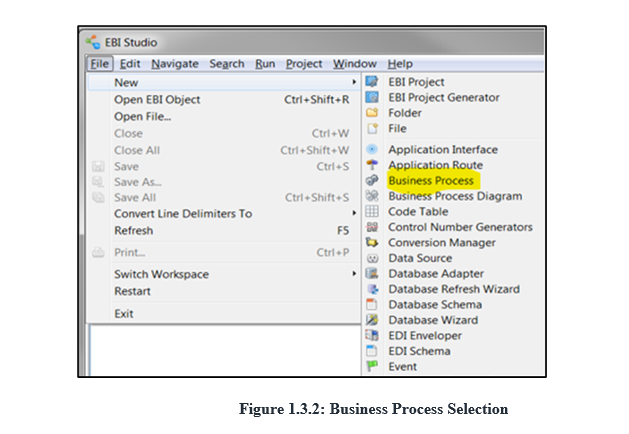
- To create a Business Process, take the following steps: select “File > New > Business Process” from the main menu (as shown in Fig 1.3.2).
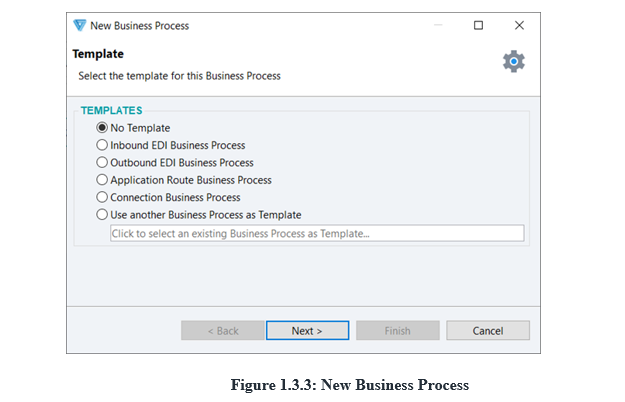
- Once “Business Process” (from the above figure) is selected, a New Business Process window appears (as shown in Fig 1.3.3).
- From the Template section, choose the “No Template” radio button and click Next (as shown in Fig 1.3.3).
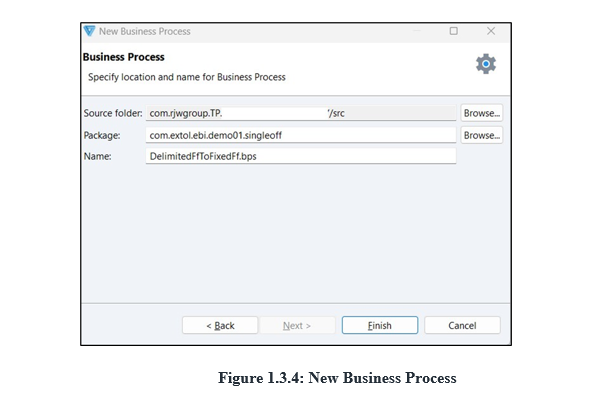
- After hitting the “Next” button on the above window (Fig 1.3.3), the window shown in Fig 1.3.4 populated. Type “DelimitedFfToFixedFfBPS” as the Business Process Name in the Name field (as shown in Fig 1.3.4) and click Finish.
- Package and Package Source Folder names are automatically populated in the below window (Fig 1.3.4).
- After hitting a “Finish” button on the above window (Fig 1.3.4) the “DelimitedFfToFixedFfBPS” Business Process object gets created, and its editor appears (as shown in Fig 1.3.5). Now Business Process requires three tasks to perform.
- Read the source data.
- Transform the data.
- Write the target data.

- To Create and Add the Read/ Transform/ Write Business Process tasks hit the ‘+’ button as on the above window (Fig 1.3.5) highlighted in the Red box.
2. Read the Source Data
- To create this task, click on the Add (+) button in the Script section (as shown in Fig 1.3.1.1)

- After clicking on the Add (+) button on the above window (Fig 1.3.1.1) another window populated with “the Click to select task entry” button.
- The list of available tasks is displayed on another window after clicking the “Click to select task entry” button. Type read in the “Search” field to filter out Tasks that can be read.
- Double-click on the ReadCsvFA (one of the “Read” Tasks available in the list) user-defined object to select it. This task is displayed on the first line (as shown in Fig 1.3.1.2)

- After double-clicking on the “ReadCsvFA” task on the above window (Fig 1.3.1.2) define this task below the window (Fig 1.3.1.3) populated.
- Click the Properties view tab. This task has one parameter. Click in the “storageNodes” field (Fig 1.3.1.3).

Note – This parameter represents the Adapter Payload (the data of the source file). The bold-italic text indicates that this is a mandatory parameter.
- Once clicking in the “storageNodes:” field on the above window (Fig 1.3.1.3) a list of available parameters and variables appears in the below window (Fig 1.3.1.4).
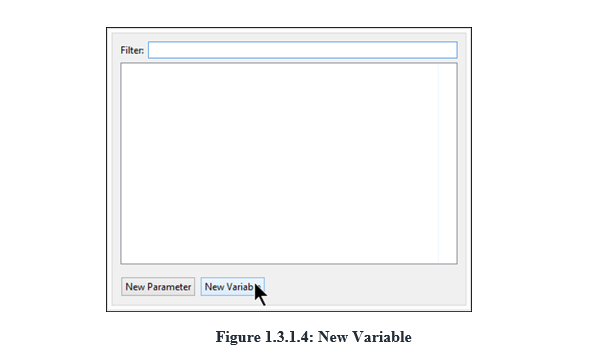
- Click on the “New Variable” tab on the below window (Fig 1.3.1.4) to define the new variable.
- After clicking on the “New Variable” tab on the below window (Fig 1.3.1.4), a window (as shown in Fig 1.3.1.5) is populated.
- On the below window (Fig 1.3.1.5) New Variable appears in the Properties view and appears in the Variables section, with the name newVariable (Fig 1.3.1.5). The newVariable can be renamed to any desired name by clicking on newVariable and changing the name.
- Double-click StorageNode on the below window (Fig 1.3.1.5) to get the list of variable types (here, “StorageNode” type is selected for the newly defined variable).
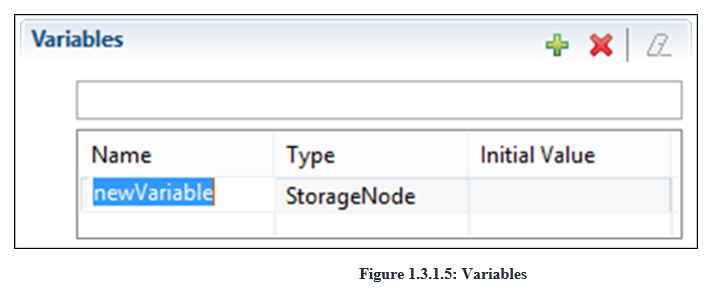
- Press Enter to rename this variable from a new variable to a source variable.
NOTE – This “Source” variable of the “StorageNode” type contains the location of the EDI Source file that needs to be transformed.
3. Transform the Data
- To create this task, click the Add (+) button in the Script section (as shown in Fig 1.3.1.1 above).
- Clicking on the “Click to select task entry” button displays a list of available tasks. To filter out Tasks available for Transform operations, type rs in a “Search” field.
- Double-click on the DelimitedFfToFixedFfRS (one of the “Transform” Tasks available in the list) user-defined object to select it. This task is displayed on the second line (as shown in Fig 1.3.2.1).

- After doing double click on the “DelimitedFfToFixedFfRS” task on the above window (Fig 1.3.2.1) to define this task on the window (Fig 1.3.2.2) as populated.
- This task has several parameters. Provide values for the first three parameters, the last three are not necessary here (as shown in Fig 1.3.2.2).
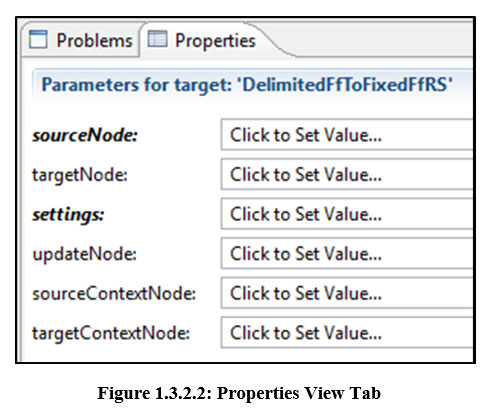
- Click in the “sourceNode:” field on the above window (Fig 1.3.2.2) a list of available parameters and variables appears on the newly populated window (like the window in Fig 1.3.1.4).
- To select the value in the “sourceNode:” field (as shown in Fig 1.3.2.2) double-click the variable name “source” which was previously defined in the Read section 1.3.1 (Read the Source Data) above. This “Source” variable contains the location or path of the Inbound EDI document file.
- Click in the “targetNode:” field (Fig 1.3.2.2) to define the New Variable for the Target Node.
- After clicking on the “New Variable” tab on the window above (Fig 1.3.1.4), another window (as shown in Fig 1.3.1.5) is populated.
- On the window above (Fig 1.3.1.5) New Variable appears in the Properties view and appears in the Variables section, with the name newVariable (Fig 1.3.1.5). The newVariable can be renamed to any desired name by clicking on newVariable and changing the name.
- Double-click StorageNode on the below window (Fig 1.3.1.5) to get the list of variable types (here, “StorageNode” type is selected for the newly defined variable).
- Here, it has been renamed from a new variable to a target, and you need to press Enter to rename this variable.
NOTE – This “Target” variable of the “StorageNode” type contains the location of the EDI Target file that will hold the data after being Transformed by the Transform Business Process. This target Location can be related to the UFD files in TLi for the Inbound EDI Document.
- Click in the “settings” field (Fig 1.3.2.2) to define the Ruleset (map) to perform the Transform operation on the source data.
- Click in the “settings:” field on the above window (Fig 1.3.2.2) a list of available Rulesets (Maps) will appear on the newly populated window.
- Click the Transformation Settings Literal tab and double-click the previously defined Comma Delimited Source TS Ruleset (Map) object to select it.
4. Write the Target Data
- To create this task, click the Add (+) button in the Script section (as shown in Fig 1.3.1.1).
- After clicking on the “Click to select task entry” button the list of available tasks is populated on another window. In a “Search” field type “wri” to Filter out the Tasks available for Transform operations.

- After double-clicking on the “WriteTxtFA” task on the above window (Fig 1.3.3.1) define this task on the similar window above (Fig 1.3.1.3) populated.
- Click the Properties view tab. This task has one parameter. Click in the “storageNodes” field (Fig 1.3.1.3).
- Once clicking in the “storageNodes:” field on the window above (Fig 1.3.1.3) a list of available parameters and variables appears on the window above (Fig 1.3.1.4).
- Double-click the previously defined “target” variable listed in the window above (Fig 1.3.1.4).
- The data transformed by the second task is the data to be written in the file name stored in the “target” variable.
- Save the object and close the editor.
Note – The “DelimitedFfToFixedFfBPS” Business Process will perform three tasks Read, Transform and Write. It reads the Inbound EDI Document received and placed at the specific location then transforms the EDI data in the EDI Document using the Ruleset defined and then writes that data into the files to process further into the ERP system.
Conclusion
Cleo File Adapters may seem like simple conduits for file transfers, but they are pivotal in enabling efficient, secure, and automated business processes. When paired with Cleo’s ecosystem integration capabilities, they help businesses bridge the gap between legacy systems and modern digital ecosystems.
Whether you are exchanging EDI documents, integrating cloud applications, or managing massive amounts of file-based data, Cleo File Adapters ensure that your processes are always connected, automated, and optimized.

